On this page
- The short version
- Three ways an agent can make a flyer, and where each breaks in print
- What you need before you start
- How to make a print-ready flyer with your AI agent
- What the PDF does not include
- Your print checklist
- How to do this faster with Krumzi
- When you should use something else
- Mistakes to avoid
- Your next flyer
- Frequently Asked Questions
You asked your AI agent for a flyer and got one of two things. A pretty picture with a misspelled street name baked into the pixels. Or a page of HTML and a suggestion to "print it from your browser." Neither one survives a print shop.
Here's the direct answer. Your AI agent can make a print-ready flyer if you connect it to a design tool through MCP instead of asking it to draw an image. Ask for the trim size (US Letter or A5), give it every word of copy, and have it export a PDF with bleed. You get back a layered flyer you can still edit, plus a file your printer can trim. Don't accept a flat image for anything you'll print more than once.
By the end of this guide you'll know which route to use, the exact steps in Claude, ChatGPT, Claude Code or Cursor, and what the exported PDF does and doesn't include. Every number below comes from a real flyer we made through an MCP on 19 November 2026.
The short version
- Connect a design MCP to your AI client, so the agent can build real layouts.
- Write a print brief: size, every word of copy, colors, and one photo.
- Set the flyer to a print size, so the export adds bleed.
- Check that no text sits in the trim zone.
- Proof every word against your brief.
- Export a PDF with bleed and send it to the printer.
Three ways an agent can make a flyer, and where each breaks in print
Most "AI flyer" advice blurs these together. They aren't the same, and the difference shows up the moment a date changes.
A flat image from an image model. ChatGPT's built-in image tool and other image models paint the whole flyer as one picture. It's quick and often good-looking. But the text is pixels, so a wrong phone number means a new image, and the next image changes things you liked. There's no bleed, and the size is whatever the model chose. Fine for a social post. Risky for a print run.
A design suite or template through an MCP. Canva's MCP generates design candidates for you to pick and finish in Canva, Adobe Express's chat app starts from matching templates, and Bannerbear fills a template you built yourself. The text stays editable, which is a big step up. You still finish in their editor, and template layouts are shared with everyone else using them.
A layout built from your brief through an MCP. Tools like Krumzi design the layout from what you typed and save it as separate layers: live text, shapes and photos. The agent can change one line without touching the rest, then export a PDF. This is the route this guide walks through. (If you're still choosing a tool rather than a workflow, our roundup of the 8 best AI flyer makers compares them side by side.)
What you need before you start
- An AI client that supports remote MCP servers. Claude (web and desktop), ChatGPT, Cursor and Claude Code all do.
- A design tool with an MCP server. We use Krumzi in the walkthrough. Its server URL is
https://www.krumzi.com/api/mcp. - Your copy, final. Event name, date, time, address, offer and website. Typos in the brief become typos on paper.
- Your printer's specs. Ask for the trim size, bleed and file format before you design. A common spec is 0.125 inch (about 3 mm) of bleed on every side.
How to make a print-ready flyer with your AI agent
We'll carry one example all the way through: a grand-opening flyer for Harbor Lane Yoga, a made-up studio, printed on US Letter paper.
Step 1: Connect a design MCP to your AI client
MCP, the Model Context Protocol, is the open standard that lets your agent call tools in another product. Connect the design tool once and every chat can use it.
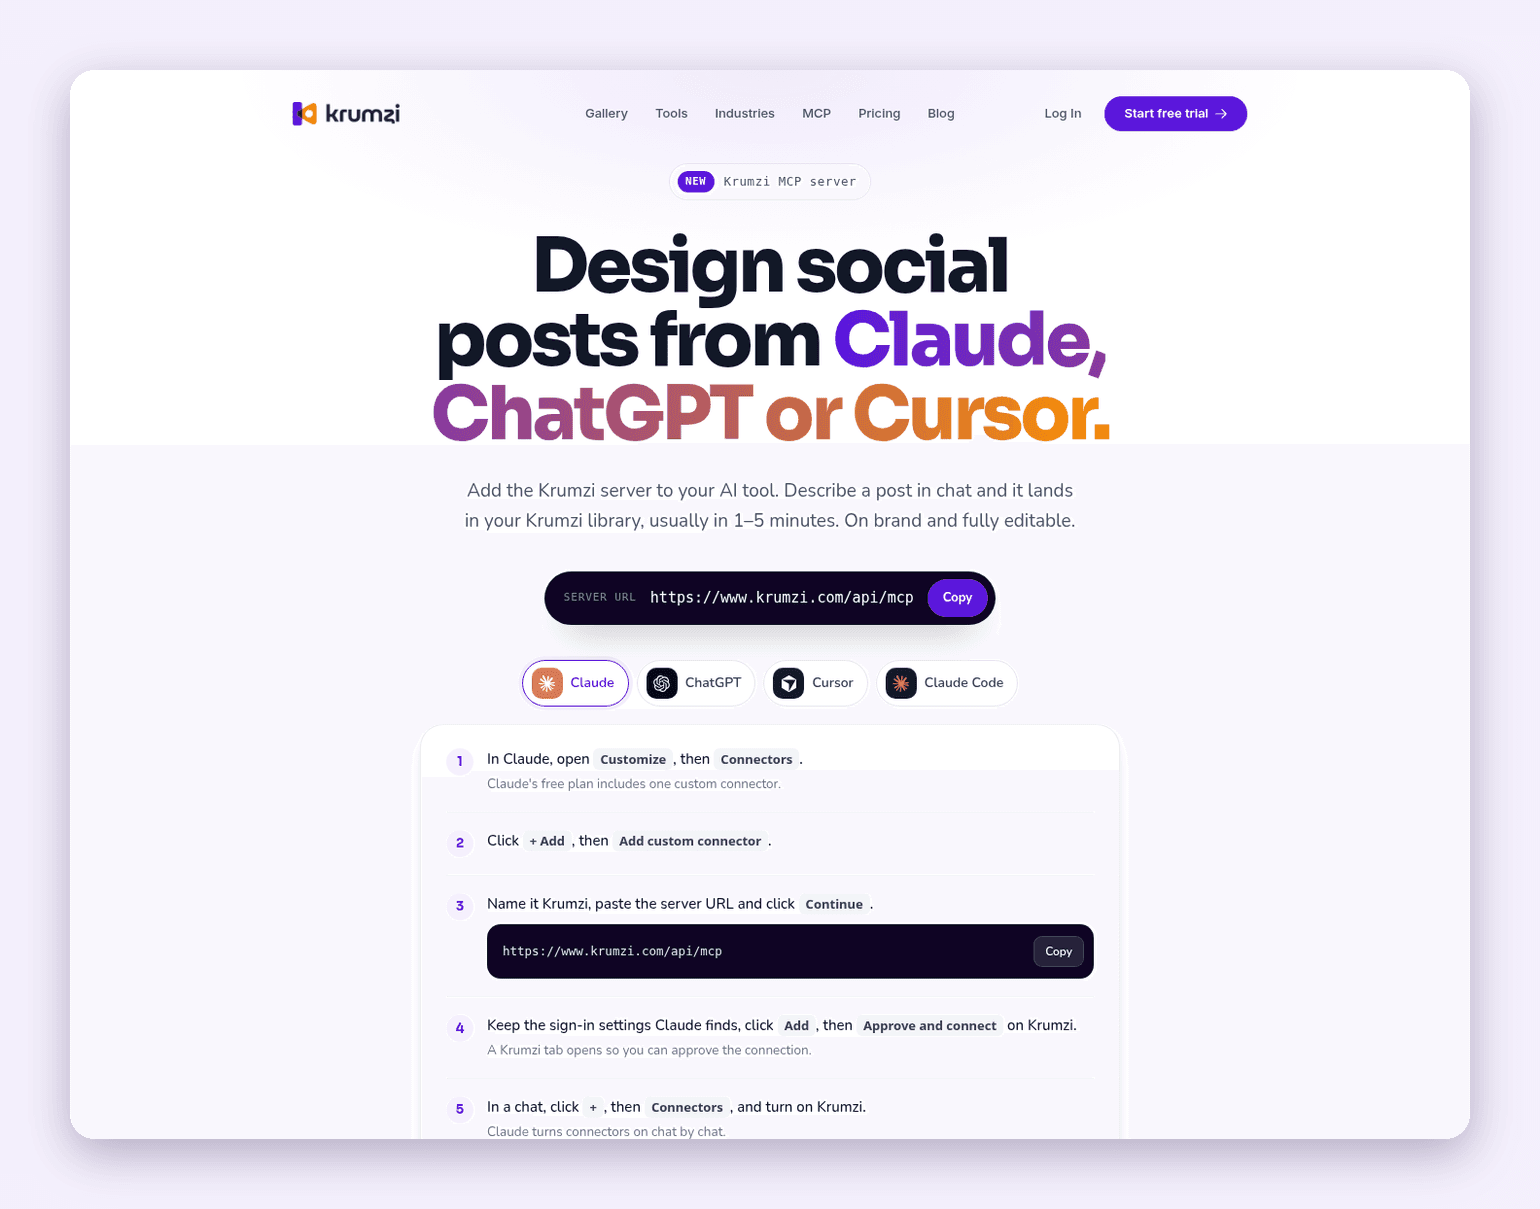
Here's the setup for Krumzi, as documented on the Krumzi MCP page:
- Claude: open Customize, then Connectors, click + Add, then Add custom connector. Name it Krumzi, paste the server URL, click Continue, Add, then Approve and connect on Krumzi. In a chat, click +, then Connectors, and turn Krumzi on. Anthropic's guide to custom connectors using remote MCP has the same flow.
- ChatGPT: follow the ChatGPT tab on the Krumzi MCP page, sign in and click Approve and connect, then start your message with "Krumzi". OpenAI's guide to adding a custom MCP server explains how ChatGPT handles any remote server.
- Cursor: open Cursor Settings, then Tools & MCP, click Add custom MCP, and add Krumzi to
mcp.jsonwith the server URL. - Claude Code: run
claude mcp add --transport http krumzi https://www.krumzi.com/api/mcp, then type/mcp, pick krumzi and choose Authenticate.
The connection uses OAuth 2.1, so you approve it on Krumzi. It can create, edit and export designs. It can't publish anything or touch billing.
Step 2: Write a print brief, not a wish
"Make me a flyer" leaves every decision to chance. A print brief names the size, quotes every word, sets the palette, and tells the agent to keep text away from the edges. Here's the exact brief our agent sent to Krumzi's generate_design tool:
A US Letter print flyer for Harbor Lane Yoga's grand opening (a made-up studio). Headline: Grand Opening. Saturday, March 6, 9am to 1pm, 214 Harbor Lane. Free first class, live music, and 20% off your intro month. Warm terracotta and cream palette, calm serif headline, a photo of a bright yoga studio, and a clear call to action: Book your free class at harborlaneyoga.com. Keep all text well inside the edges for print.
The agent also passed seven exact strings as required text: the headline, the date, the time, the address, "Free first class", "20% off your intro month" and the website. Krumzi's get_design tool then reports, string by string, whether each one made it onto the flyer word for word.
The canvas was 1275 x 1650 pixels, which is 8.5 x 11 inches at 150 dpi. The first version was ready in under 3 minutes and cost 114 AI credits.
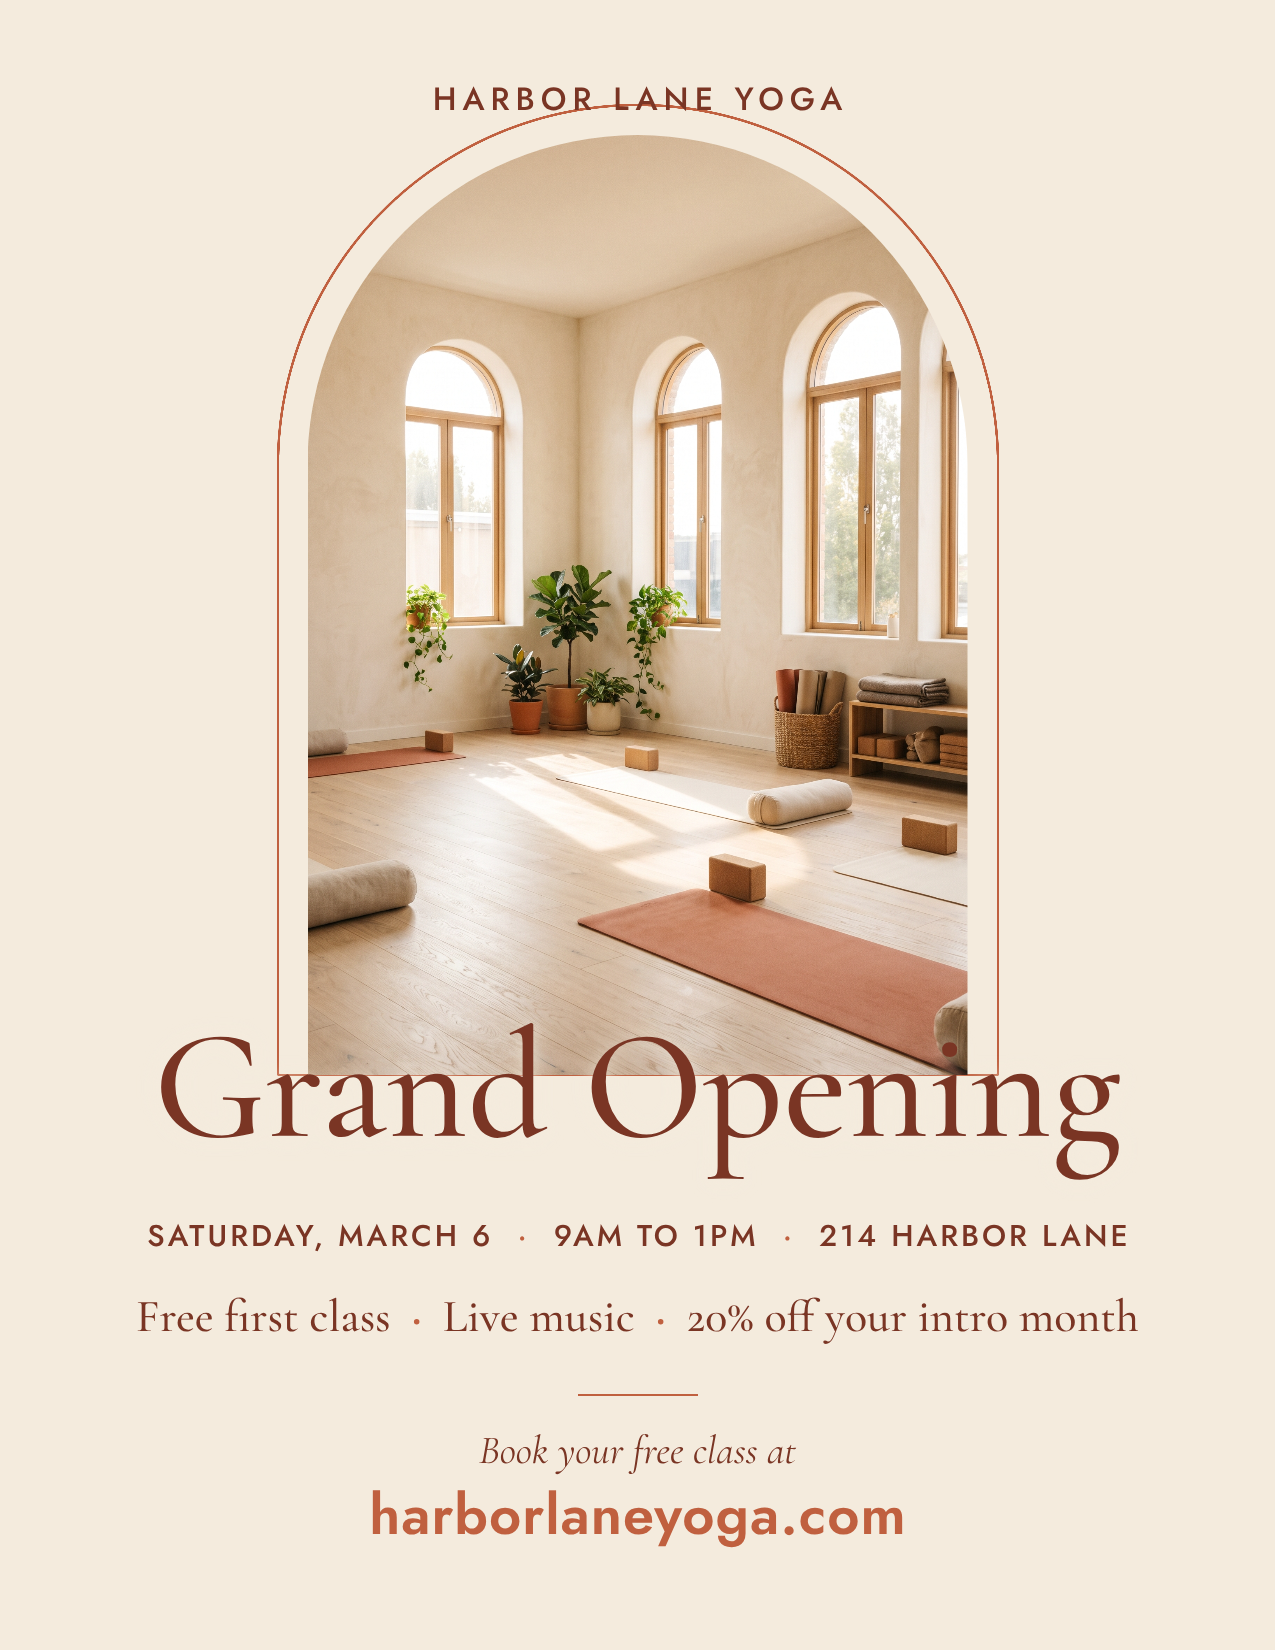
All seven required strings came back found. The copy sits in 6 live text layers, plus the photo, an arch frame and a rule. That's the difference you pay for: every one of those lines can be retyped without redrawing the flyer.
Step 3: Set the flyer to a print size
This is the step most guides skip, and it's the one that decides whether you get bleed.
Generating at the right pixel size isn't enough on its own. In our run, a PDF exported straight after generation came out at screen dimensions with no bleed. The fix is one tool call: the agent runs resize_canvas with the flyer-letter preset (or flyer-a5 for A5). That marks the design as print, at 150 dpi trim size, and tells the export to add bleed.
Krumzi's print presets cover US Letter flyers (8.5 x 11 in), A5 flyers, 18 x 24 inch and A2 posters, and US Letter and A4 documents. Just ask your agent: "Set this to the US Letter print size before you export."
Step 4: Check that no text sits in the trim zone
Printers cut with a tolerance. Anything too close to the edge can get sliced off. Ask the agent to run a safe-area check.
In our run, check_safe_area flagged exactly one problem: the studio name at the top crossed the print safe margin by 1 pixel. The agent moved that one layer 12 pixels down with update_elements. That edit cost 0 credits and didn't touch anything else.
If you're adding a QR code for bookings, our guide to adding a QR code to a flyer covers size and placement so it still scans after printing.
Step 5: Proof every word against your brief
Read the flyer out loud. Dates, times and addresses are where flyers go wrong, and nobody notices until 500 copies arrive.
With required text set in Step 2, the agent can tell you what's missing before you look. For anything else, ask for the change in plain words ("change the time to 10am to 2pm") or, for a single line, have the agent edit that text layer directly. You never need a new flyer to fix one word.
Step 6: Export a PDF with bleed
Now ask: "Export this as a PDF with bleed." The agent calls export_design with format pdf, and bleed is on by default for print designs.
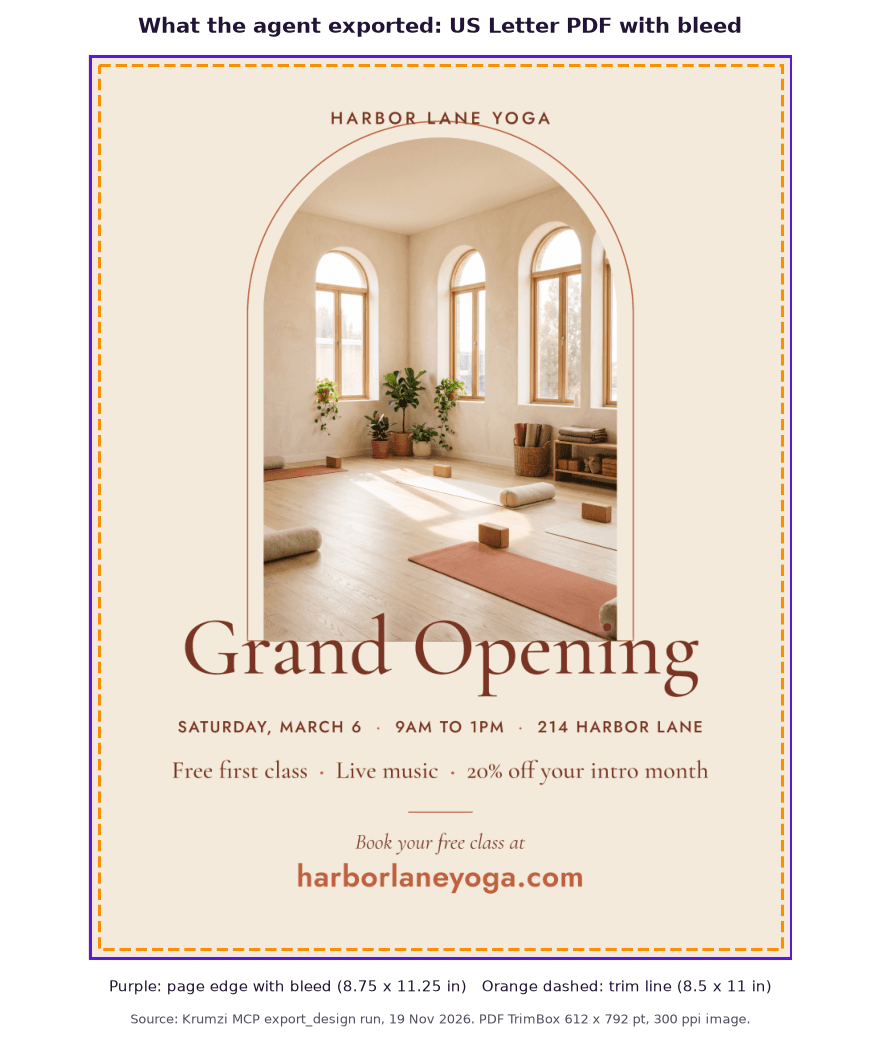
Here's exactly what our exported file contained, checked with a PDF inspector:
- Trim size: 612 x 792 points, which is exactly 8.5 x 11 inches.
- Bleed: about 0.125 inch on every side, so the full page is about 8.75 x 11.25 inches, with the background running into the bleed.
- Trim and bleed boxes: both set in the PDF, so print software knows where to cut.
- Resolution: the artwork is a 300 ppi image.
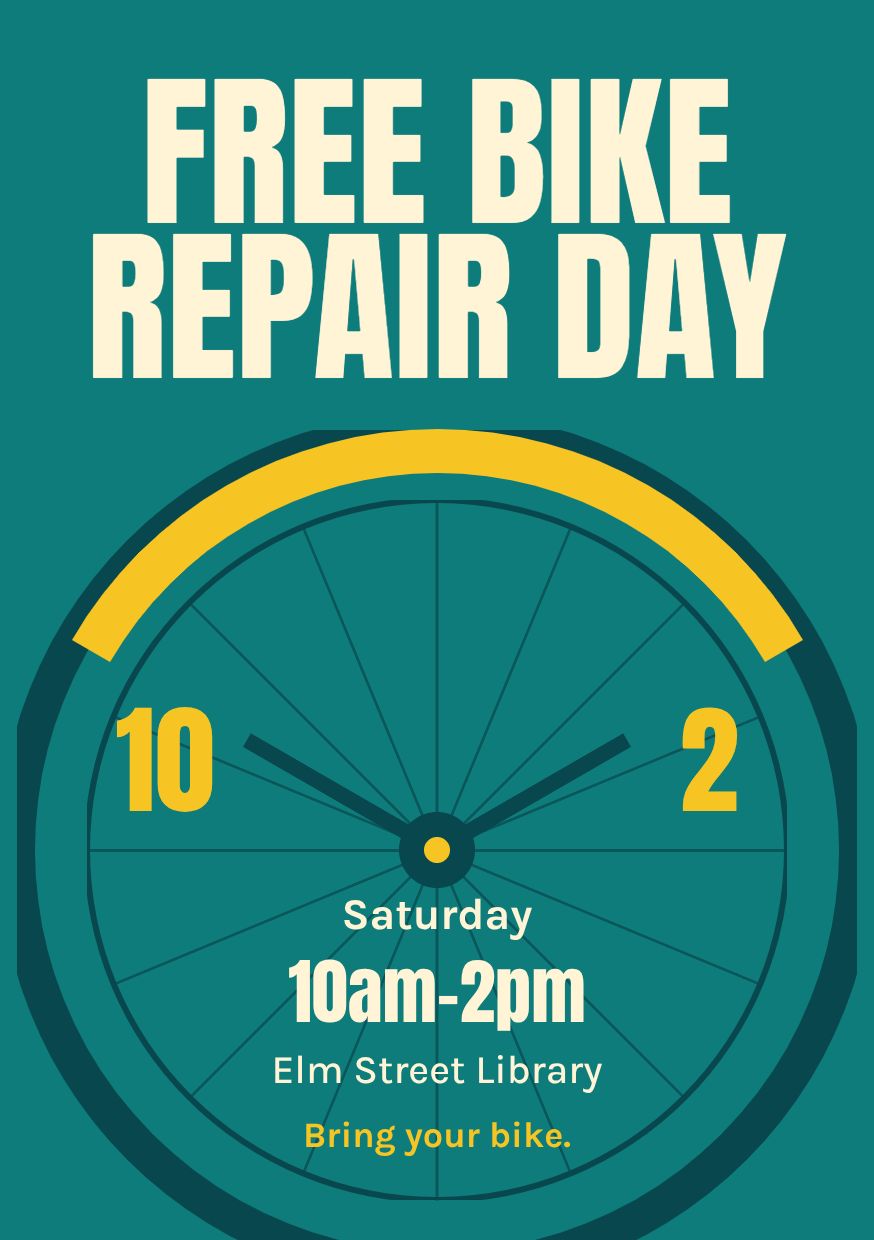
The same steps work for A5. Here's an A5 flyer from a one-sentence brief ("An A5 flyer for Saturday's free bike repair day at Elm Street Library, 10am to 2pm, in teal and sunflower yellow"). After setting the flyer-a5 preset, its PDF trimmed to 148 x 210 mm with the same bleed.
Step 7: Send it to your printer
Upload the PDF to your print shop and tell them the trim size. Ask one question before you pay: "Do you need CMYK or PDF/X?" Some printers accept an RGB PDF and convert it. Some don't. The answer decides whether you're done or need one more step (see the limitation below).
What the PDF does not include
Here's the honest part. The PDF you get through Krumzi's MCP is a 300 ppi RGB image with trim and bleed boxes. It doesn't include crop marks, CMYK conversion or a PDF/X profile, and the text inside the PDF is part of the image, not live type. Your text stays fully editable in the Krumzi design itself, so a change means a new export, not a redesign. If your printer takes RGB PDFs, that's fine. If it demands PDF/X with CMYK, it isn't.
Your print checklist
| Check | US Letter flyer | A5 flyer |
|---|---|---|
| Trim size | 8.5 x 11 in | 148 x 210 mm |
| Krumzi preset | flyer-letter | flyer-a5 |
| Bleed | 0.125 in each side | 0.125 in (about 3 mm) each side |
| Resolution in the PDF | 300 ppi | 300 ppi |
| Text | Inside the safe margin | Inside the safe margin |
| Copy | Every word in the brief, checked | Every word in the brief, checked |
For other sizes, see our flyer size guide.
How to do this faster with Krumzi
If you'd rather not build every flyer by hand, Krumzi turns your brief into an editable flyer, in the chat you already have open. The agent designs it with generate_design, sets the print size, checks the safe area and exports the PDF, and you can open the same design in the Krumzi editor any time to drag things around.
Pricing, verified on krumzi.com/pricing on 19 November 2026: Starter is $19 a month, Pro $39 and Studio $89, with yearly plans at $190, $390 and $890. Agency is priced with you. Printing for one event? The month pass gives you everything in Pro for 30 days for $49 once, and nothing renews. The MCP page adds that any Krumzi account can make five designs a month through the connection without the Krumzi badge, and you don't add a card.
When you should use something else
- Your printer requires PDF/X or CMYK. Use a tool with press export. Popcorn Editor documents PDF/X-4 export with CMYK and bleed, though its agent connection has no export tool, so you export by hand in its editor. Adobe InDesign is the classic choice.
- Your team already has approved Canva templates. Use the Canva MCP or Adobe Express in chat, and keep the templates your brand team signed off.
- You need 300 versions of one layout. Use Bannerbear's MCP to fill one template from a spreadsheet.
- It's only going on Instagram. A flat image from ChatGPT is fine if you'll never edit it. Our ChatGPT flyer guide shows how to get the best one.
Mistakes to avoid
- Accepting a flat image for print. One typo and you're starting over.
- Skipping the print preset. Without it, you get a screen-sized PDF and no bleed.
- Putting the date near the edge. It's the line most likely to get trimmed and the one people need most.
- Paraphrased copy. Pass the exact strings as required text, so the agent can't "improve" your address.
- Forgetting the printer's question. Ask about CMYK and PDF/X before you upload, not after the proof comes back.
Your next flyer
The workflow doesn't change from flyer to flyer: connect once, brief properly, set the print size, check, export. If you want a gentler start without an agent, our guide to making a flyer with AI covers the same ideas in the Krumzi app.
Want your agent to do the layout? Start free trial and ask it for your first print flyer. 3-day free trial, card needed. No charge until day 4. Cancel online anytime.
Frequently Asked Questions
How can my AI agent make a flyer?
Connect it to a design tool through MCP, then give it a print brief with the size and every word of copy. The agent builds a layered flyer in that tool and exports a PDF. Asking the agent to draw the flyer as an image gives you a picture you can't edit.
Can ChatGPT or Claude make a print-ready flyer?
Yes, through a design connector. On their own they produce copy, code or a flat image. Connected to a design MCP such as Krumzi, they can produce an editable US Letter or A5 flyer and export a PDF with 0.125 inch bleed. If you work mainly in Claude, this walkthrough covers Claude Design, file creation and the connector route.
Is there an AI that designs a flyer with editable text and layers?
Yes. Brief-to-layout tools like Krumzi return the flyer as separate layers, so every text line stays editable. Canva and Adobe Express also keep text editable, though you finish the design in their editors.
What bleed does a flyer need for printing?
A common spec is 0.125 inch (about 3 mm) on every side. Keep text inside a safe margin away from the trim line, too. Always check your printer's spec sheet before you export.
Does the exported PDF include crop marks and CMYK?
Not through Krumzi's MCP. The PDF has trim and bleed boxes and a 300 ppi RGB image, without crop marks or a CMYK profile. Some printers convert RGB for you. If yours needs PDF/X with CMYK, use a tool with press export.
A month of posts, designed before your coffee cools
Describe the post. Krumzi designs it from scratch, on your brand, fully editable.
Start free trial3-day free trial, card needed. No charge until day 4. Cancel online anytime.